So, my sister brought home bananas from work to my parents house when we were all visiting together around Christmas. They were READY to be eaten! We ate some of them, but couldn't eat them all. I was looking at them tonight and decided to make some banana bread out of the remnant! Here is the recipe I used (and made).
Adapted from the Spice Islands Banana-Date-Walnut Bread recipe from The Passionate Vegetarian by Crescent Dragonwagon. http://www.passionatevegetarian.com/
Cooking spray
2 cups whole wheat flour
1/8 cup lemon juice, or the grated rind and juice of 1 organic lemon
3 extremely ripe bananas
1/2 cup brown sugar
1/4 cup coconut oil
3 tablespoons greek yogurt
1/2 teaspoon salt
3/4 teaspoon baking soda
1 teaspoon saigon cinnamon
Preheat oven to 375 and spray your bread pan.
Cream banana, coconut oil, yogurt, lemon juice and sugar. Set aside.
Mix in separate bowl the flour, baking soda, salt, cinnamon. Add the dry ingredients to the wet and mix thoroughly.
Pour mixture into your pan evenly.
Cook 40-50 minutes. Cool 10 minutes, then set out on wire rack to cool.
Enjoy!
It's cooking right now, so I haven't tried it yet. The original recipe calls for vegetable oil, walnuts, dates, nutmeg.... as I don't really like nuts and dates in breads, I decided to leave these out... and I don't have nutmeg, so just cinnamon will do, especially a bit more than the original recipe calls for! :-)
I really like this cookbook, as it is GIGANTIC!!! Chock-full of lovely veggie recipes!! I usually don't follow recipes, so mostly following this one is... odd. :-)
Friday, December 28, 2012
Wednesday, December 5, 2012
Monday, December 3, 2012
Chocolate Mousse
A couple of weeks ago, I hosted a Wild Tree tasting. They do natural grapeseed oils, spices, ready to go meals that are natural. One of the things I needed to do as a hostess was make sure the sampling packets got made up into the ready to eat formats. We had raspberry cheesecake with graham crackers, chocolate mousse, smoked mozarella and tomato dip with crackers, and then all the grapeseed oil flavors as a dip for bread.
They were all tasty, but I especially liked that the chocolate mousse was so easy. I bought the heavy cream for it before the tasting, and then followed the instructions on the packet. It said to whip up the cream with a hand mixer until it formed soft peaks, then fold in the packet, which contained cocoa powder, sugar and vanilla. It worked famously and was delicious! I decided to try making my own one day..........
So, I bought more heavy cream a little while back, then made a recipe today.
8 oz. heavy cream
2 tbsp. cocoa powder
4 tbsp. powdered sugar
I added all these to my Quick Chef with the whipping blade on. I turned and turned it, checking every so often for consistency. After only a few minutes, it was done! And really yummy... I'm thinking of making it again with carob powder. I think it will be great!
What yummy things have you cooked up recently?
Tuesday, July 3, 2012
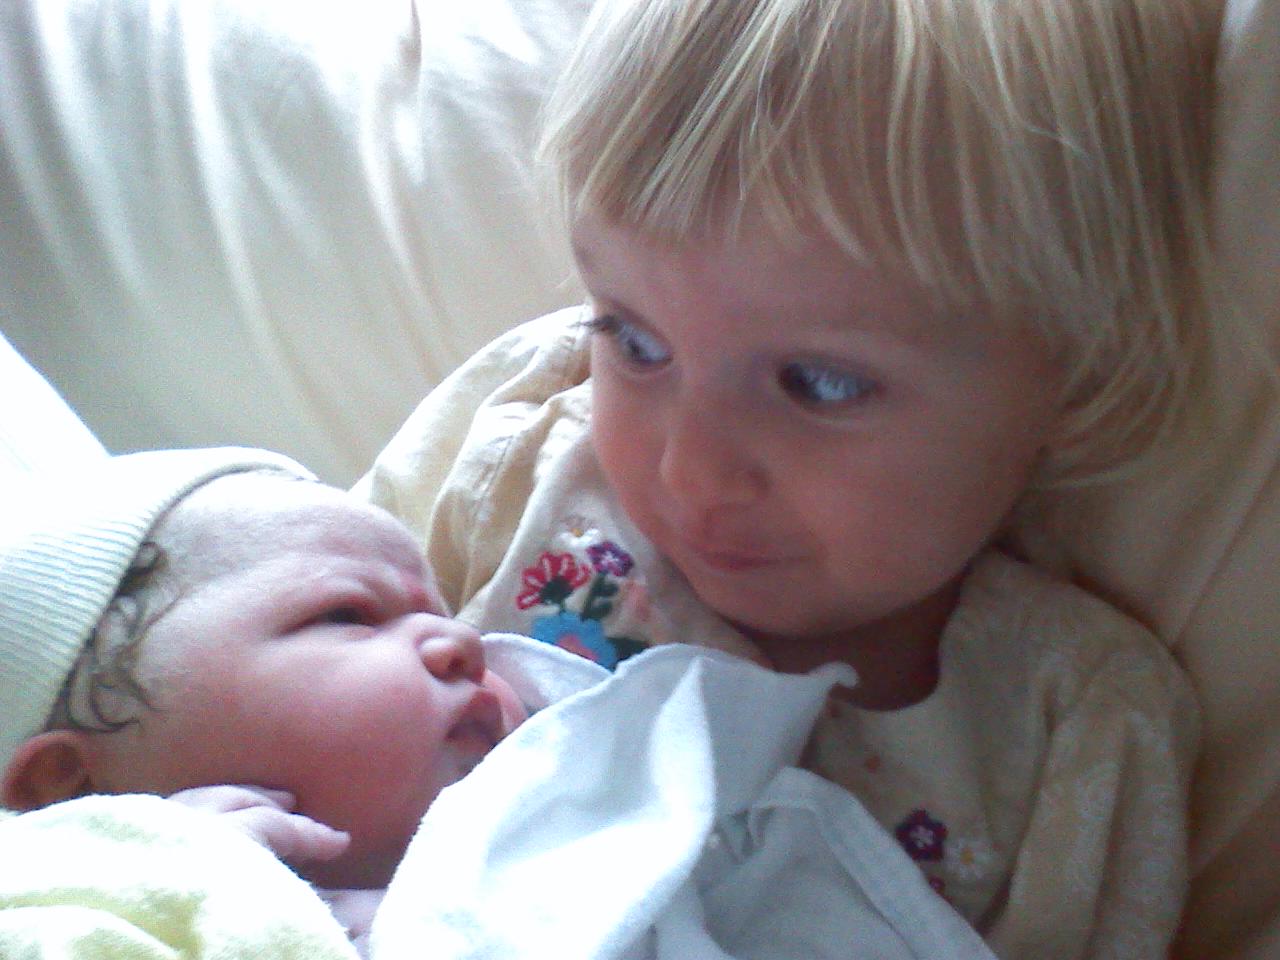
Mollye Beth is born!
I wanted to write down a bit of my birth story with Mollye before I forgot, so here goes...
In the wee hours between 3:30 and 4:00 am yesterday, contractions started. They started out pretty slow, but not very mild. I had to try to relax this time. The contractions with Merry starting ut were much more mild. This time, the first couple of contractions woke me up, but I went back to sleep thinking it was only the normal Braxton-Hicks contractions I had been experiencing recently. After a few more, I woke Jordan up to let him know that something was different this time. He started timing the contractions, as well as the strength. The longer between contractions, the stronger they were, but the ones that were close together were much nicer. :-)
At 4:37 we let my mom know what was going on. She called Misty to head our way from Tucson.
Contractions were getting stronger, and even sitting on the toilet wasn't making them much better, so I asked Jordan to get the pool ready. I thought to myself that there is no way I can do all the contractions like this! While waiting, I had got nauseous and threw up. This is typically a good thing in labor, as it tends to open the cervix more. Not really my favorite thing, but it serves a purpose. Getting in the pool was nice though. Contractions were still there, still strong, but I was able to relax much easier. I was in the tub for most of my labor.
Merry was up at around 7 and came in to see me. This was both good and bad. I wanted her there, but then she was wide awake and bouncy and ready for the day.... I wasn't. She ended up coming and going several times, watching Wishbone in the living room and eating breakfast with grandma. :-) She asked a couple of times if I was ok, and wanted to make sure that I was. She did great!
Misty arrived, but I don't know for sure what time that was. I lost track of time somewhere around 4. All I needed to focus on was getting through the contractions, so that's what I worked on. I ate a little, drank a little, changed rooms and positions a few times, but I just needed to get through those contractions, which was not easy!
Somewhere around 10, or maybe after (not keeping track here...), I decided to see if pushing with the contractions felt better. It did! I asked Misty to check me, and she said I was fully dilated! After that, I sometimes pushed with the contractions, sometimes just tried to really relax and stay open.
After a little while like this, I decided to see if I could feel baby's head. I could!!! About two knuckles in!! OK, let's just get this baby out! A few more contractions while pushing and a knuckle and a half in! Pretty soon, I felt baby's head moving down and scraping on my bones. Soon after that, baby was to "the ring of fire." Just a little more and baby would be out! I pushed as hard as I could and I could feel the head moving out even more. This was the hardest point to push through because I wanted to get the baby out, but I didn't want to tear. It was push really hard, then blow and relax... not an easy combination! Baby's head was coming out!! I could feel it, most of it was out! I asked if all the head was out, but not yet, so I had to push a bit more, then a bit more. Out! Baby's head turned! Breathe... Push more! Out comes baby's body! Jordan brings baby up and out of the water to me. Waaaaaaaaaaaaah! Baby's lungs are working great! We rest for a bit, talking to baby, making sure the airways are clear and everything is ok.
A few minutes later, we decided to see if baby was a boy, or girl. It's a girl!!! (Now to find her name...) Now, we see if she wants to nurse. A couple minutes and tries and she latches on like a champ! She nursed for several minutes, and several minutes later we checked to see if the cord was still pulsing. We checked a few times before it stopped. When it did, it was time to cut! Jordan cut between the clamps and she was separate from me.
After a little while of just hanging out in the pool, nursing, talking, relaxing, it's time to get out. Jordan takes the baby, while I get out. We make our way to the bedroom and the nice cozy bed. We're cold from water and hormones, so we get covered up nice and warm! Ahhhhh.... pillows! After a bit, mom asks if I can use the bathroom... Holy cow! I've missed my bladder having space! Now that she's out, I'm thirsty and hungry, so Jordan fixed me a cheese omelet and some cantaloupe and watermelon! Nice, nice, nice!!!!
A short time later, misty brings in the placenta for us to look at. It has a heart shape to it and it's awesome! I love placentas...
Merry goes out with Misty and grandma to the living room, so Jordan and I have time to talk about names. We talk about my grandma's name, Mollye Sue Nell, as well as a few others. We decide Mollye is a good first name, but what about a middle name? Wouldn't it be fun if we had Merry Beth and Mollye Beth? Ok, let's go with that!

 Mollye Beth Jones, born July 2nd at 11:57 am. She weighed 9 lbs. 4 oz. and was 21 inches!
In the wee hours between 3:30 and 4:00 am yesterday, contractions started. They started out pretty slow, but not very mild. I had to try to relax this time. The contractions with Merry starting ut were much more mild. This time, the first couple of contractions woke me up, but I went back to sleep thinking it was only the normal Braxton-Hicks contractions I had been experiencing recently. After a few more, I woke Jordan up to let him know that something was different this time. He started timing the contractions, as well as the strength. The longer between contractions, the stronger they were, but the ones that were close together were much nicer. :-)
At 4:37 we let my mom know what was going on. She called Misty to head our way from Tucson.
Contractions were getting stronger, and even sitting on the toilet wasn't making them much better, so I asked Jordan to get the pool ready. I thought to myself that there is no way I can do all the contractions like this! While waiting, I had got nauseous and threw up. This is typically a good thing in labor, as it tends to open the cervix more. Not really my favorite thing, but it serves a purpose. Getting in the pool was nice though. Contractions were still there, still strong, but I was able to relax much easier. I was in the tub for most of my labor.
Merry was up at around 7 and came in to see me. This was both good and bad. I wanted her there, but then she was wide awake and bouncy and ready for the day.... I wasn't. She ended up coming and going several times, watching Wishbone in the living room and eating breakfast with grandma. :-) She asked a couple of times if I was ok, and wanted to make sure that I was. She did great!
Misty arrived, but I don't know for sure what time that was. I lost track of time somewhere around 4. All I needed to focus on was getting through the contractions, so that's what I worked on. I ate a little, drank a little, changed rooms and positions a few times, but I just needed to get through those contractions, which was not easy!
Somewhere around 10, or maybe after (not keeping track here...), I decided to see if pushing with the contractions felt better. It did! I asked Misty to check me, and she said I was fully dilated! After that, I sometimes pushed with the contractions, sometimes just tried to really relax and stay open.
After a little while like this, I decided to see if I could feel baby's head. I could!!! About two knuckles in!! OK, let's just get this baby out! A few more contractions while pushing and a knuckle and a half in! Pretty soon, I felt baby's head moving down and scraping on my bones. Soon after that, baby was to "the ring of fire." Just a little more and baby would be out! I pushed as hard as I could and I could feel the head moving out even more. This was the hardest point to push through because I wanted to get the baby out, but I didn't want to tear. It was push really hard, then blow and relax... not an easy combination! Baby's head was coming out!! I could feel it, most of it was out! I asked if all the head was out, but not yet, so I had to push a bit more, then a bit more. Out! Baby's head turned! Breathe... Push more! Out comes baby's body! Jordan brings baby up and out of the water to me. Waaaaaaaaaaaaah! Baby's lungs are working great! We rest for a bit, talking to baby, making sure the airways are clear and everything is ok.
A few minutes later, we decided to see if baby was a boy, or girl. It's a girl!!! (Now to find her name...) Now, we see if she wants to nurse. A couple minutes and tries and she latches on like a champ! She nursed for several minutes, and several minutes later we checked to see if the cord was still pulsing. We checked a few times before it stopped. When it did, it was time to cut! Jordan cut between the clamps and she was separate from me.
After a little while of just hanging out in the pool, nursing, talking, relaxing, it's time to get out. Jordan takes the baby, while I get out. We make our way to the bedroom and the nice cozy bed. We're cold from water and hormones, so we get covered up nice and warm! Ahhhhh.... pillows! After a bit, mom asks if I can use the bathroom... Holy cow! I've missed my bladder having space! Now that she's out, I'm thirsty and hungry, so Jordan fixed me a cheese omelet and some cantaloupe and watermelon! Nice, nice, nice!!!!
A short time later, misty brings in the placenta for us to look at. It has a heart shape to it and it's awesome! I love placentas...
Merry goes out with Misty and grandma to the living room, so Jordan and I have time to talk about names. We talk about my grandma's name, Mollye Sue Nell, as well as a few others. We decide Mollye is a good first name, but what about a middle name? Wouldn't it be fun if we had Merry Beth and Mollye Beth? Ok, let's go with that!

Tuesday, May 8, 2012
Making dried apples!
We had two that were a bit soft and wrinkly, so I cut them in half, used a melon baller to take out the center, sliced them, then placed them on the cake cooling rack and cookie sheet. The oven was set to the lowest setting, then I turned it off when it heated up. I'm going to turn it on the lowest setting again in a little while, then turn it off for a while... probably a couple more times... then they should be pretty dry.... I hope. :-)


Monday, May 7, 2012
More pictures from my first quilt...

Here is the quilt before the trimming and edging.

Before the trimming and edging again. You can see it a bit better against the couch.

After the trimming.

After the edging. Merry decided to help me with the pictures! :-)
Saturday, April 28, 2012
My first quilt!
So, I decided to start a new project... no, I haven't finished all the others yet... but this is a time-sensitive project, so I decided to get it going! My first quilt! I used some cotton fabrics that I already had, as well as a blanket for the batting in the middle... Here it is!

I still need to trim the edges, then add a binding all around, but then it will be DONE!
I used the "quilt as you go" method, found here: http://www.youtube.com/watch?v=rl_OPPpXNLM and it worked really well!
It started out being 35" x 35", but it will be a bit smaller once the edges are trimmed.
I'm pretty happy with it and want to do another one! :-) But I have other sewing projects to finish... like my capris... and my pads... and another mini quilt/sushi roll diaper changing pad... and a few others.
That's all for now though... time to sleep! :-)
Tuesday, April 24, 2012
Making jeans from scratch...
So, today I decided to try my hand at making a pair of maternity jean capris from scratch ...(scary, right?)...
I used a simple method for making Merry two pairs of really cute shorts, but could I really make something bigger? I was determined to find out!
The simple method I used is as follows...
Make sure you have an iron for appropriate pressing! All fabric should be pre-washed, pressed and ready to go! Also, be sure you have enough thread and notions for the look you are going for.
Get out a pair of jeans that you like the fit of. Fold this in half, as if to fold and put away. Trace around this, adding extra for seam allowances and any needed for darts, etc. I've found that most jeans are higher in the back and lower in the front... be sure to allow for this as well (I didn't and had to add on extra in the back).
For my project today, I simply cut my fabric on the fold line, which gives me an inside seam, but no seam on the outside of the legs. In the future, I will cut just shy of this (making sure to add enough for seam allowances) to make seams on the outside as well (I just like the look of it). I left a 1" seam allowance for this project.
After all the cutting, sew a basting stitch line along all the seams, so you can try it on. To do my basting seam, I simple set my sewing machine to the longest stitch length. Note: do NOT back stitch! You have to take out this basting line, and back stitching makes it harder. Back stitch your final sewing line, not here! :-)
Next, I tried on my capris. I found that even though I'd left a 1" seam allowance and sewed 1" in, this wasn't enough (I think my ready to wear pair might have been a bit stretchier). I then sewed another basting line at the 1/2" mark and this was pretty perfect! (I tried my capris on again after ripping out the 1" basting line... and found that I had back stitched at both ends... bad idea...)
If you have made your pattern and cut your fabric correctly, you won't need to do the following...(I did neither of those.... )
After trying on my capris, I found that the front was too high (my belly is getting quite large and needed a bit more room), and the back was too low. I found that the amount needed on the back was approximately the same as what I needed to cut from the front, so I sewed that piece to the back. I also needed to include darts to the back.
After each sewing step, it is really helpful to press open your seams! This gives you a better look at what you are doing, as well as making any cross seams easier to sew. You can press the seams open, or press them to one side, depending on your preference.
For this project, I sewed the middle section, which includes the crotch section, first. I then sewed the legs, which meant that instead of "right sides together," I had to do one leg "right sides together," then the other leg "right sides together." I hope that made sense... I'll do pictures next time!
I've got the major seams together now. I need to do the rest of the top stitching, hemming, and adding of some elastic to make a nice and comfy maternity band.... oh, and the pockets... and any other pretty details. I will take pictures of the finished project, as well as pictures along the way next time!
Subscribe to:
Comments (Atom)